Need event-driven onsite maintenance SMS reminders, progressive incident notification that escalates across channels and teams, or a custom OTP / step‑up verification for sensitive actions?
This tutorial walks you through installing and configuring the Messenger for ServiceNow plugin (also known as ServiceNow Messenger) to send and receive SMS messages directly from your ServiceNow instance. By the end you would would have created a basic incident notification workflow which can be expanded into one of the above examples or adapted into existing workflows.
Prerequisites
Before you begin, ensure you have:
- ServiceNow instance with admin access (compatible with versions supporting Flow Designer and Spokes)
- Hub account with one of our supported CpaaS providers (We will be using MessageMedia in this example)
- Update Set XML file for the ServiceNow Messenger plugin
- Sub-production or sandbox instance recommended for initial testing
Important: Always test integrations in a non-production environment first to avoid disrupting live workflows.
Step 1: Install ServiceNow Messenger Plugin
Messenger for ServiceNow plugin is delivered as a ServiceNow Update Set, making installation straightforward.
Installation Steps
- Download the Update Set XML from the API Shift modules portal or support contact
- In ServiceNow, navigate to System Update Sets → Retrieved Update Sets
- Click Import Update Set from XML
- Select your downloaded XML file and click Upload
- Once uploaded, open the update set record
- Click Preview Update Set and resolve any conflicts
- After preview completes successfully, click Commit Update Set

Pro tip: Take a snapshot or backup of your instance before committing any update set, especially in production environments.
Step 2: Configure Hub API Credentials
To connect ServiceNow to your CPaaS network, you need to configure API authentication credentials from your MultiTXT Hub.
Get Your API Credentials
- On the Hub for your messaging provider navigate to Settings → API Settings (or use this direct link)
- In the Basic Authentication section, click Create Key
- Enter a descriptive name like ServiceNow Production
- Click Create Key
- Important: Copy both the api_key and api_secret immediately — the secret is only shown once

Store Credentials in ServiceNow
The API key and secret need to be encoded to a token. Use the tool in the docs to encode your key and secret. This encoded value will be needed in the spoke action later.
Security Best Practices
- Use different keys for production and non-production instances
- Rotate credentials periodically (update both Hub and ServiceNow)
- Never commit credentials to source control or share in documentation
Step 3: Create SMS Workflows with Flow Designer
For users who prefer visual workflow builders, ServiceNow Messenger integrates seamlessly with ServiceNow Flow Designer.
Building an SMS Notification Flow
- Navigate to Flow Designer in ServiceNow
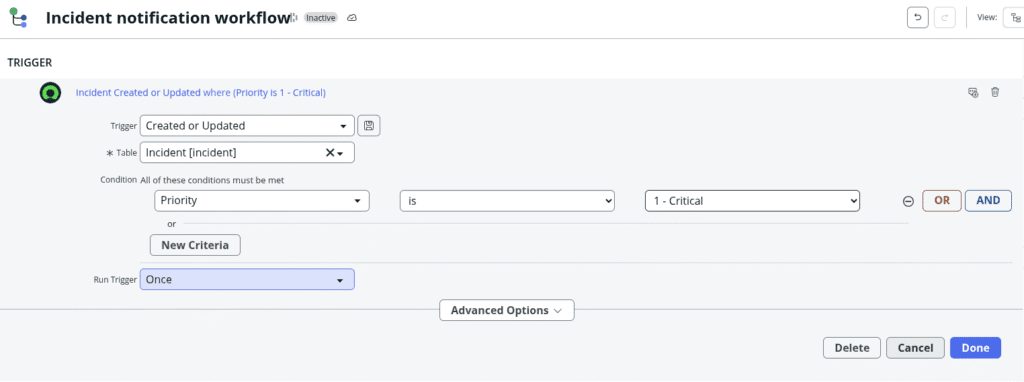
- Create a new flow or edit an existing incident workflow
- Add a Trigger: “Record Created or Updated” on incident table
- Add a Condition: Check if priority is 1 (Critical) or 2 (High)
5. Add Action: Search for “Messenger” and select Send SMS
6. Configure the action fields:
Field Mapping Example:
Phone Number: Add an E.164 phone number to message
Message:

URGENT: Incident [Incident Record > ID] assigned. Priority: [Incident Record > Priority]

Please check your email for details.

Basic Auth: The API key and secret need to be encoded to a token. Use the tool in the docs to encode your key and secret.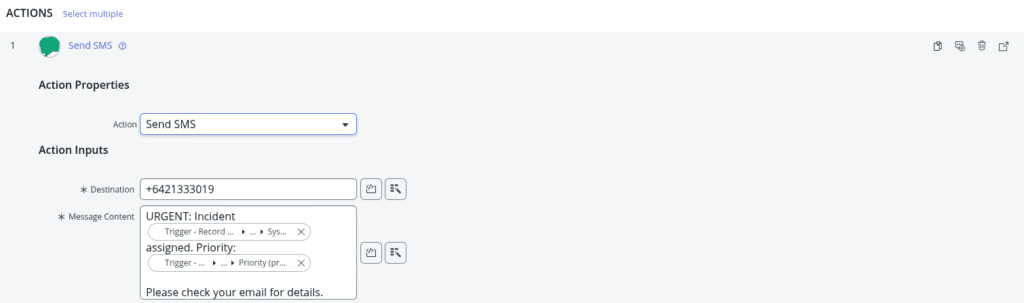
Add a Update Record action to log the notification:
- Record: Use the trigger incident
- Field: Work Notes
- Value: “SMS alert sent to caller at ” + Caller Mobile Phone
Activate your flow

Flow Designer Tips
- Use data pills to dynamically insert incident fields into your message
- Keep messages under 160 characters for single-segment SMS (or use up to 1,600 for concatenated messages)
- Add error handling subflows to capture failed sends
- Test with Flow Test Run before activating in production